Kingfisher · Three moves to notice
Where can this bird still go?
By Green Bean Studio · Published
Reviewed
Two habitats give you eight squares apiece. The smallest gives you one. Start with the bird that has the least choice.
These three situations use Kingfisher’s first Journey board, First Meadow. It is a one-bird puzzle: one bird in each row, each column, and each colored habitat. Birds cannot touch, even diagonally. Later variants have their own rules; this lesson stays with the one-bird board.
The diagrams label habitats A–E as well as coloring them. A solid dot is a bird already placed. Coordinates count from the top left, so R4C5 means row 4, column 5. Each question is followed by a folded answer: pause before opening it.
Situation 1 · Habitat shape
The tiny orange square
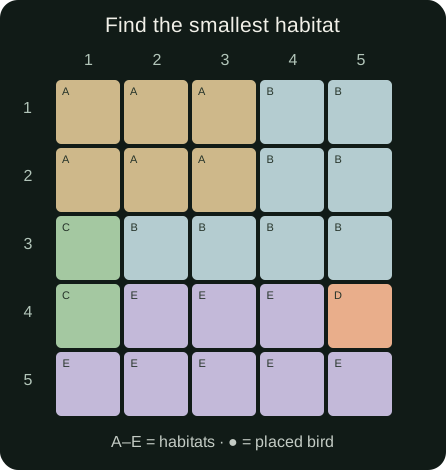
Your move: Which habitat lets you place a bird without eliminating anything first?
Show the placement and its reason
R4C5 gets a bird. Habitat D contains exactly that one square. Since every habitat needs a bird, the square is forced. There is no tie to break.
That placement also uses row 4 and column 5. Mark the other squares in both as unavailable, and remember the diagonal neighbors. One small habitat has just simplified several large ones.
The habit matters more than the shortcut. On a larger board, the smallest habitat may still have two or three squares. Count the candidates that remain, not just the area of the original color patch.
Situation 2 · An occupied row
Two green squares, one usable row
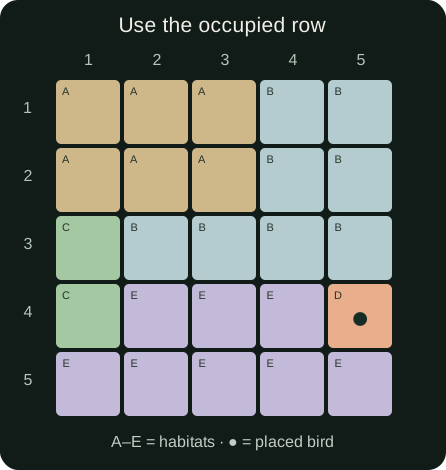
Your move: Can habitat C use its lower square at R4C1?
Show the exclusion
No. Place C’s bird at R3C1. The bird at R4C5 already uses row 4. Distance across that row makes no difference: R4C1 would still be a second bird in the same row.
C has only two squares. Removing R4C1 leaves R3C1 as its sole candidate. This new bird uses column 1 and makes the diagonally neighboring R2C2 unavailable.
A common mistake is to check only whether birds touch. “Far apart” does not override the one-per-row rule. Check row, column, habitat, and spacing separately.
Between the diagrams
Give habitat B a home
After those two placements, the pale-blue B habitat can use only R1C4 or R2C4. Column 5 is occupied, and its row-3 squares are unavailable because row 3 already has a bird.
Try R1C4 in your head. That would occupy row 1, so the tan A habitat would have to use row 2. Column 1 is occupied; R2C2 touches the bird at R3C1; and R2C3 would touch the hypothetical bird at R1C4. A would have nowhere to go. Reject R1C4 and put B’s bird at R2C4.
This is a short contradiction, not a guess left on the board. You have named the exact habitat that would become impossible.
Situation 3 · Diagonal spacing
The square that looks almost safe
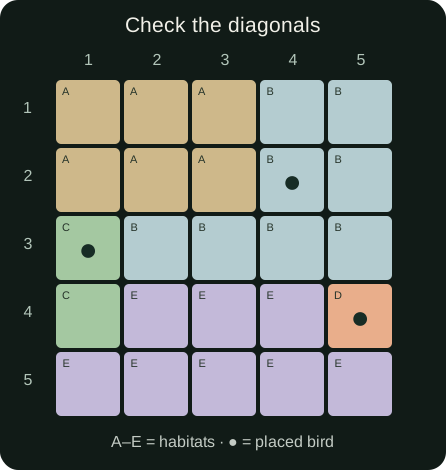
Your move: Does A’s bird belong at R1C2 or R1C3?
Show the diagonal check
R1C2 is the safe square. R1C3 touches R2C4 diagonally. It is in a different row and column, but that is not enough. R1C2 passes the row, column, habitat, and spacing checks.
Now only row 5 and column 3 lack a bird. Their intersection, R5C3, sits in habitat E and touches no bird. It completes the board.
The five birds end at R1C2, R2C4, R3C1, R4C5, and R5C3. This is the unique solution to this board.
Keep the order of questions: who has one candidate, which row is already used, and which diagonals are closed?