Sundown · The complete solve
One puzzle, every decision explained
By Green Bean Studio · Published
Reviewed
The useful starting point is not the emptiest row. It is the pair of suns already sitting together in row 2. They have something definite to tell you.
Open Sundown in your browser, choose Play by code, and enter OLD-ORANGE-SALT. This 6×6 board has eleven starting symbols and no match or differ marks. The diagrams below reproduce that board; they are teaching diagrams, not screenshots.
A small board with no free guesses
Each row and column needs three suns and three moons. Three of the same symbol cannot sit consecutively, and two completed rows or columns cannot be identical. Those are checks on the whole puzzle, even when a move is forced by just one of them.
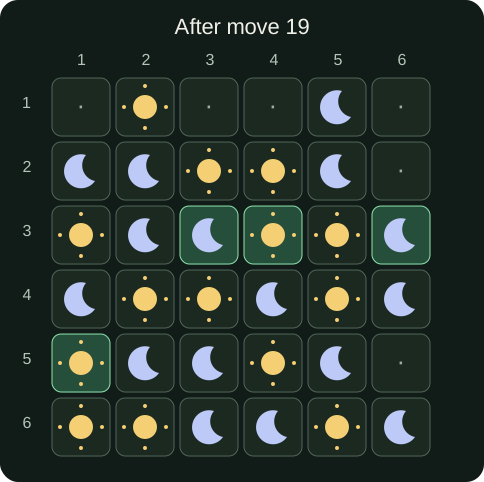
Read coordinates as row, then column: R2C3 is the third square in the second row. The sun has rays; the moon is a crescent. A dot is an empty square. In later diagrams, a green outline marks a square filled since the previous diagram.
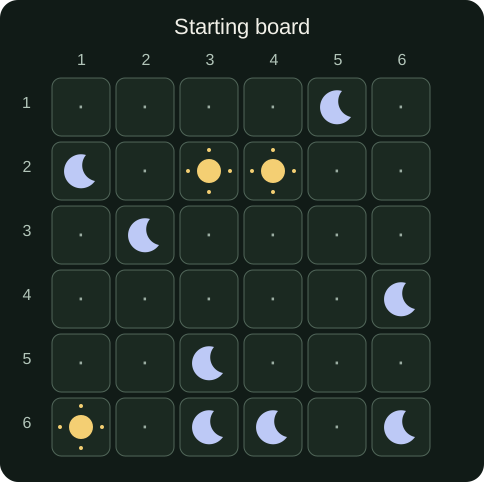
Read the starting grid as text
S means sun, M means moon, and a dot means an empty square. Read each row from left to right.
Row 1: . . . . M .
Row 2: M . S S . .
Row 3: . M . . . .
Row 4: . . . . . M
Row 5: . . M . . .
Row 6: S . M M . M
It is tempting to put a sun next to the lone moon in row 1. Resist that for now. “The line needs both symbols” is a quota, not a reason to choose this particular square. A good first move should rule out the other symbol immediately.
Two pairs get the board moving
The row-2 suns force a moon on each open end. At the bottom, the two neighboring moons force suns at their open ends. These four moves are local: there is no need to compare every row or count the entire board yet.
- R2C2 → moon. Close the left end of the suns at R2C3 and R2C4.
- R2C5 → moon. The other open end of that sun pair is R2C5.
- R6C2 → sun. The moons at R6C3 and R6C4 need a sun on their left.
- R6C5 → sun. Protect the same bottom-row moon pair at its right end.
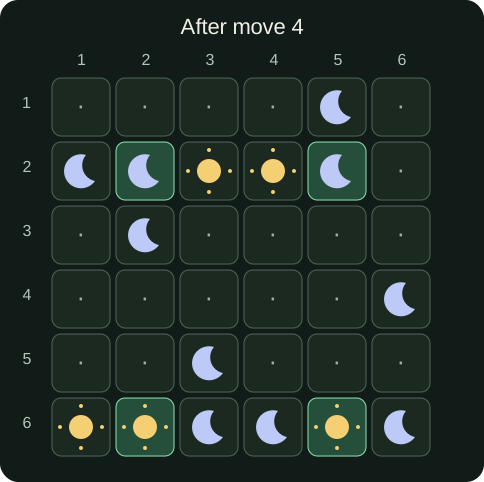
Turn the corner into the columns
R2C2 was empty a moment ago. Its new moon now sits above the given moon at R3C2. Look above and below that vertical pair. This is why scanning across the board beats finishing one row at a time.
- R1C2 → sun. The new moon at R2C2 joins R3C2. A sun caps them above.
- R4C2 → sun. Cap those same two moons below, at R4C2.
- R4C3 → sun. The moons at R5C3 and R6C3 also need a sun above them.
- R4C1 → moon. R4C2 and R4C3 now form a sun pair. Close its left end.
- R4C4 → moon. Close that row-4 pair’s right end too.
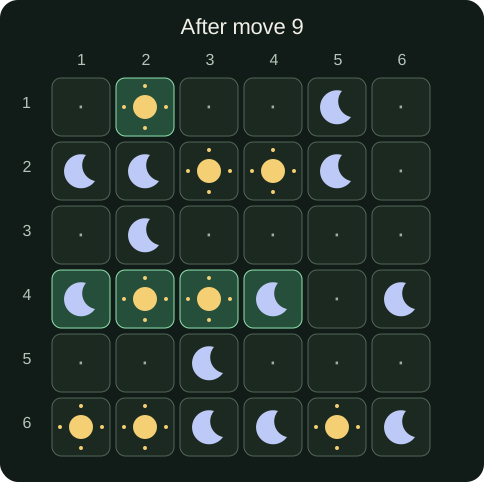
The gaps are useful now
Row 4 now has moons in columns 4 and 6. The square between them cannot also be a moon. This separated-pair pattern uses the same no-three rule as an adjacent pair, but it is easy to overlook when your eye is hunting for touching symbols.
- R3C5 → sun. R1C5 and R2C5 are moons; stop their run from extending downward.
- R4C5 → sun. Fill the gap between the moons at R4C4 and R4C6.
- R5C5 → moon. R3C5 and R4C5 now make two suns together. Put a moon below them.
- R5C4 → sun. The moons at R5C3 and R5C5 leave a one-square gap for this sun.
- R3C1 → sun. Look up and down column 1: R2C1 and R4C1 are moons. Separate them.
- R5C2 → moon. R4C2 and R6C2 are suns. Their middle square must be moon.
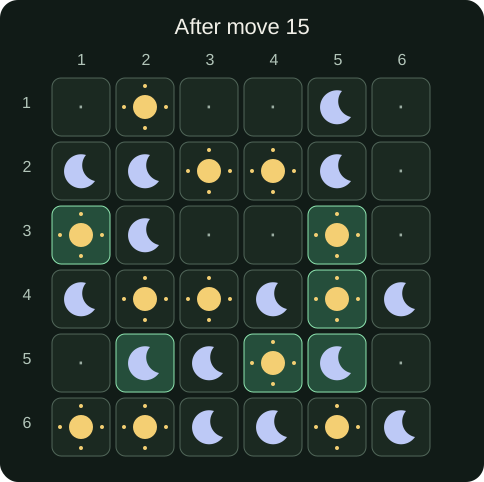
One answer becomes the next clue
The middle of the board begins to close. Follow each new symbol into a perpendicular line before looking for a fresh starting point. You are still using the same two deductions; the board is simply giving them more places to work.
- R5C1 → sun. The moon pair at R5C2 and R5C3 cannot extend left.
- R3C3 → moon. R2C3 and R4C3 are suns with this single square between them.
- R3C4 → sun. The newly placed moon at R3C3 joins R3C2. Put a sun to their right.
- R3C6 → moon. R3C4 and R3C5 are now suns; cap their right end.
Bring the last lines home
Only the top row and the right edge remain. Do not switch to guessing because the puzzle looks nearly finished. The same short runs finish every remaining square.
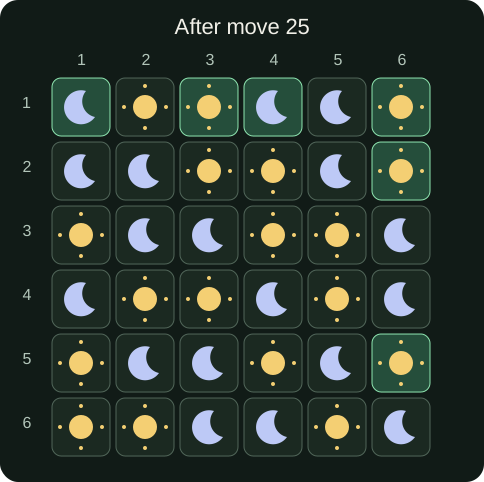
- R1C4 → moon. R2C4 and R3C4 make a vertical sun pair. Cap it above.
- R1C3 → sun. R1C4 and R1C5 are moons. Keep their left neighbor sunny.
- R1C1 → moon. R1C2 and R1C3 are suns; the row’s first square cannot be a third.
- R1C6 → sun. The moons at R1C4 and R1C5 also need a sun on their right.
- R2C6 → sun. R3C6 and R4C6 are moons. Close the top of that vertical pair.
- R5C6 → sun. Close the bottom of the same pair at R5C6. That is the last empty square.
Check the answer, not just the empty count
The finished rows, from top to bottom, are shown below. S means sun and M means moon. Each contains three of each symbol; the columns do too. No line contains a triple, and no completed row or column repeats.
M S S M M S
M M S S M S
S M M S S M
M S S M S M
S M M S M S
S S M M S M
This particular board needs only adjacent-pair and separated-pair deductions. Balance and distinct-line rules remain part of Sundown, but they did not have to force a move here. On another board, placing the third moon anywhere in a row forces every remaining square in that row to be a sun. That count may be what breaks the deadlock.
Try the code again without the walkthrough. When you pause, describe the reason before tapping: “a moon here would make three.” If the best explanation is “it looks right,” leave the square open and inspect its column.